
Tiller Locks:
When it comes to tiller locking devices, there's certainly no
shortage of them. Do a Google search for "tiller tamer", or
"tiller lock" or something similar, and before you know it you'll have
spent your entire day looking at a bewildering assortment of different
types, both commercially available and home made. Don't ask me how I know that.
Tiller locks generally fall into four main categories.
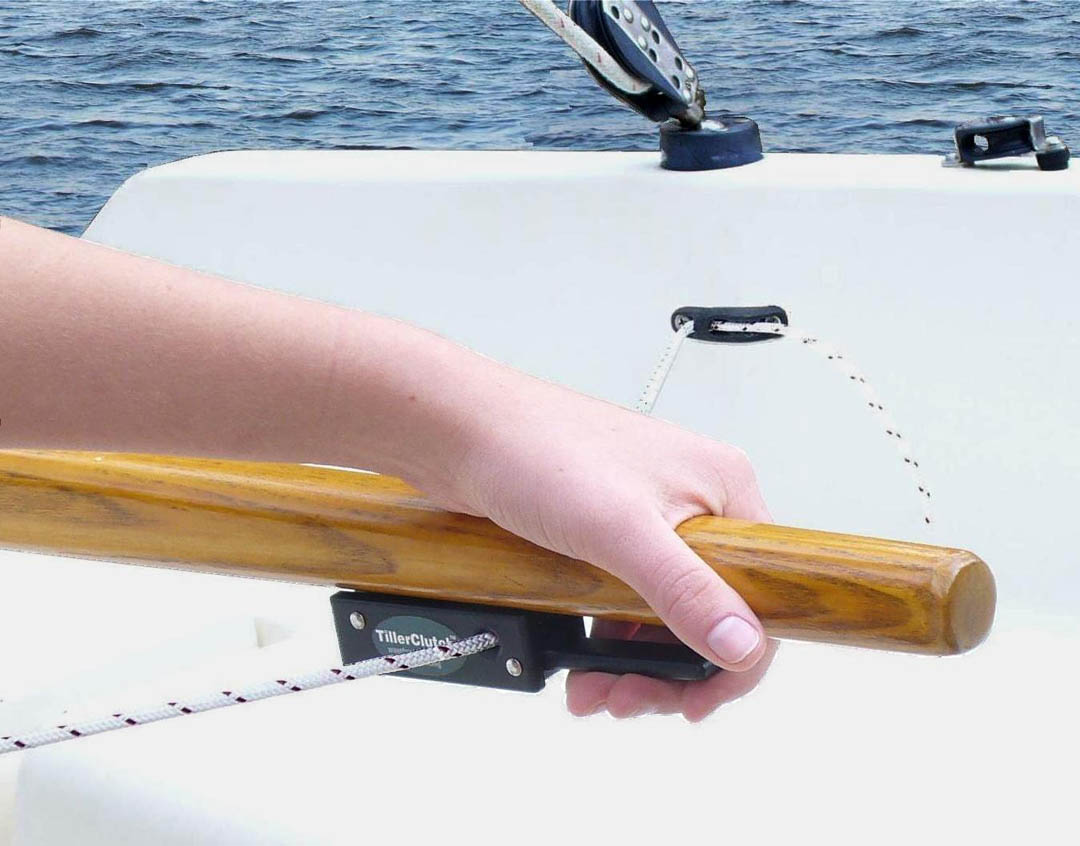
First, you've got your on-off lever action type, like this TillerClutch for example. These usually have a lever mounted towards the front of the tiller that allows you to alternate between locking the tiller in place, or allowing it to move freely. It's always locked or unlocked, there's no in-between.
 Then there's the Solid Brace type. These consist of an adjustable rod that goes from the tiller to a box usually mounted on the seat back. They're designed to be rugged. The rod doubles as a tiller extender and can be easily detached to unlock the tiller. The rod's length can be adjusted as needed.
Next, there's the Friction Knob type, like the ever popular Tiller Tamer. Here, a knob is used to adjust the amount of friction anywhere from very loose to a full lock. 

 Also using adjustable friction technology are a variety of DIY Shock Cord, Rope and Bungee types, like the Huntingford Helm Impeder. These are usually home-made and can range from a single piece of rope stretched between two cleats, to devices constructed from bungee cords, fairleads, camcleats, various blocks, plastic hooks, elastic straps, neoprene tubing and other stuff.
Of course they all have their pros and cons. So how do you decide which one to buy or build?
What makes a good tiller lock (in my opinion):
- Adjustability means flexibility. I favor the devices that allow the friction to be adjusted from completely free tiller movement all the way up to a full lock. Dialing in just enough friction to hold the tiller in place still allows an occasional nudge to adjust the boat's course. Full lock is needed when the boat is going in reverse. Like when launching or heaving-to for example.
- Don't get in the way. Most devices have ropes that lead from the front of the tiller to the sides of the boat that block access to outboard motors, block seats, and so on. This can be a major drawback on a boat with limited space to begin with.
- Quickly disabled and enabled. I want to be able to quickly and easily disable or remove the device when I'm done using it, or in case of an emergency.
- A DIY solution, inexpensive and easily constructed from readily available parts.
- Strong, reliable, and should not be ugly.
How my tiller lock works:
My tiller lock is a Friction Knob type. Tightening the knob pulls up on an eye-bolt, pinching a line against a strip of leather with increasing friction. The amount of friction is fully adjustable from very loose to a full lock. The friction between the rope and leather is smooth, consistent, and the leather will not wear out any time soon. It is not necessary to locate the tiller lock near the front of the tiller on a boat the size of mine, or on any boat with a well balanced helm. I located mine slightly forward of my aft coaming and ran the line almost straight across. There, the line is not blocking my way at all but still functions perfectly, so long as I keep the line free of slack. Two jam cleats on my coaming allow me to easily tension the line tightly. I can instantly remove the device by pulling the line off the jam cleats. A leather washer under the knob protects the tiller from damage and its friction prevents the knob from turning on its own.


Materials needed:
To make my tiller lock all you'll need a stainless steel eye-bolt and a few other small items that you can probably find lying around the house or garage. The eye-bolt I used is a Stanley V2161 that I got from Lowes for $1.28. You'll also need a small scrap of leather, a couple stainless steel screws, a short piece of rope, and a couple small scraps of wood. You may also need to purchase a couple small jam cleats. The knob can be made from a scrap of wood by tapping a threaded hole in it or using a threaded insert, or you can buy a threaded plastic knob at a hardware store for $2.60 like I did. Or simply use a stainless steel wingnut.
Building the tiller lock:
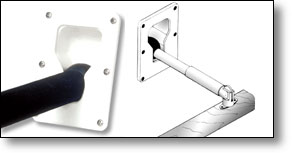
The lock is very simple and building it should be quite self-explanatory. Here is a cutaway diagram of how it goes together:

Make the bottom piece from a scrap of wood measuring 2-1/2" long by 1" high by 3/4" thick. I used white oak. Cut a 1/4" slot completely through it, long enough for the eye-bolt to fit through, and counter-bore a couple of screw holes in it. Round off the corners.


Cut a strip of leather as wide as the inside diameter of the eye-bolt and long enough to wrap around the wooden piece. Leather from an old belt works fine. Insert the eye-bolt, then add the leather strip, holding it in place with glue or a couple brass tacks. Make a leather washer for under the knob. Drill the hole in the leather washer oversized so the eye-bolt can freely move up and down through it.
Attach to your tiller, kick back and relax!