This blog is devoted to my John Welsford designed 15' Navigator yawl Ellie. I built her in my garage over a period of 18 months and launched her in 2011. She sports a sliding gunter main, roller furled jib and sprit-boomed mizzen. Her construction is glued-lapstrake over permanent bulkheads and stringers. This blog is a record of her construction and her voyages here in the Puget Sound area and (hopefully) a useful resource for fellow Navigator builders.

Wednesday, October 27, 2010

A little more work on the transom

Tonight I cut two more holes in the transom. A 1" drain hole, and a square hole for the boomkin.
That makes a grand total of 17 perforations through my transom. Six for the Duckworks motor mount, eight holes for the gudgeons, and three more for the tiller, boomkin and drain!  I hope the boat will still float despite all these holes!


Another challenge was how to trim all the planks flush with the transom. I thought about using a saw but was afraid of scratching the surface of the transom and chipping the planks. Then I thought I'd carefully whittle away at them with a sharp chisel. That would have taken forever.  I ended up using the Gain Machine


I set the Gain Machine so that the router bit was flush with the bottom of the base, like this:


Then, holding the base firmly against the transom, I used the Gain Machine to route the protruding planks flush with the transom.


The planks were perfectly flush a few minutes later.

Monday, October 25, 2010

Planking Complete!

We passed another major milestone this weekend - installation of the final plank - the sheer strake.
WoooHooo!


I decided to minimize the number of splices in this strake, because I am hoping it will look good enough to varnish. Since the Navigator is a 15' boat, I was just barely able to make the sheer strakes using one scarf joint in the middle. I figure one splice looks better than two.


I tried to do the best job I could with the scarf joints.  They look nice and clean but I won't know for sure until after they're faired and a coat of epoxy is applied. If it doesn't look good, I can always paint it or apply a vaneer.

But for now, time for a beer!

Tuesday, October 12, 2010

Planking away

Work has slowed a bit as we move into the rainy season here in the Pacific Northwest. Not only are the days getting shorter, colder and wetter, but I'm back to working overtime. *sigh*

Nevertheless, I'm glad to say that I am making some progress.

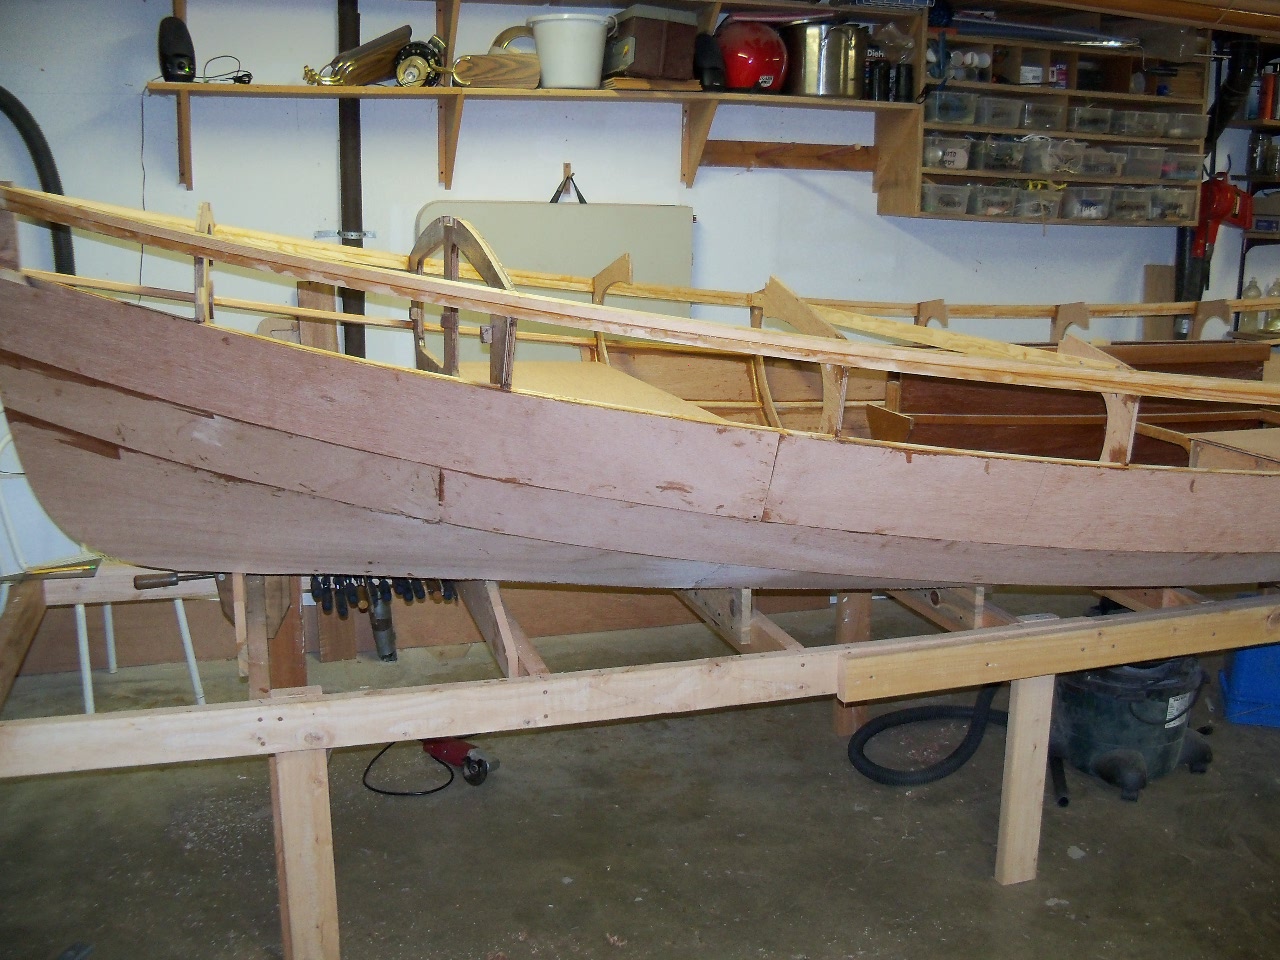
I've got most of the third row of planking on.


I've fitted the anchor well floor, the front seat, and started fitting the rear side seats. It's a good idea to cut these to size before installing the third row of planking. It's much easier to fit them in place over sized and scribe the outer hull position using a batten then to try and fit them later.


I have learned two valuable lessons this time around:

Lesson #1. Carefully inspect your plywood, no matter how good it's supposed to be. After installing part of my starboard plank, I noticed that something looked odd at one of the edges. Closer inspection revealed this:

.
Yikes! About a half inch of the edge of this sheet of plywood didn't get bonded properly. I'm using Aquatek BS-6566 marine plywood and I've built two boats using this stuff, and this is the first time I've run across a flaw like this.  I had to trim a half inch from the forward edge of one of my planks, which was already installed, to get rid of the bad edge.  I'm inspecting every piece from now on.

Lesson#2: When installing the planks, it's easy to clamp them along the top edge, but the bottom edge has to be fastened with screws, which are removed after the epoxy cures.  This leaves a line of ugly screw holes that has to be plugged and sanded. I started doing it this way but then I found a better way. Now I use my PowerShot staple & nail gun loaded with 1/2" nails.


This stapler has just enough power to drive these tiny little nails most of the way through a 1/4" sheet of plywood and into the underlying stringer.  To install the plank, I goop the stringers up with "peanut butter", clamp the plank in place along the top, then press firmly along the bottom and drive in a nail every few inches or so.


 The little nails are easily pulled later on with a pair of pliers, leaving just a little pinhole.  The only downside is that the stapler has a tendency to jam but it still beats using screws by a long shot IMHO.