Building a plywood boat over 8 feet in length always involves joining two or more sheets of plywood end-to-end. There are several ways to join the sheets. Scarf joints, butt joints, and puzzle joints are three popular methods.
Scarf joints are the default method unless you’re assembling a kit boat. Scarf joints are strong, offering a large glue surface. They handle bending forces well and they bend in a fair curve. However they can be difficult and time consuming to cut accurately, and they can be difficult to align precisely when joining the panels.
Butt joints with butt blocks are very simple and easy to make. They align precisely and they’re strong. Their downside is they may not bend fairly. They can create a flattened area due to the double plywood thickness at the join. They are functional, but unattractive inside in a visible area.
Puzzle joints are virtually always found on CNC cut kits. They can be as strong as a scarf or butt joint provided the size and shape of the puzzle is designed properly and the joint is fiberglassed on both sides. They look rather attractive finished bright, or are invisible inside and out when painted. They handle bends without deformation. They precisely align and interlock the sheets of plywood making joining precise and foolproof. However, puzzle joints require a high degree of precision to cut accurately – precision that a CNC machine offers but a homebuilder simply cannot match without an accurate jig.
 |
The puzzle joint
|
For quite some time I envisioned a router jig that could cut puzzle joints using a flush trim or pattern router bit. A 4 foot long jig made of aluminum or plastic would work great for splicing sheets of plywood. Armed with such a jig I wouldn’t need an expensive CNC machine to cut puzzle joints. The problem is I’d need an expensive CNC machine to cut the jig. That’s when the whole idea goes all recursive.
But wait! 3D printers are becoming commonplace now. They’re getting inexpensive and they’re accurate to 1/10 of a millimeter. Woodworkers 3D print templates for all kinds of projects, like cutting boards for example, all the time. 3D printers can’t print a jig 4 feet long, but they’re more than accurate enough to print a jig that can be assembled in multiple pieces.
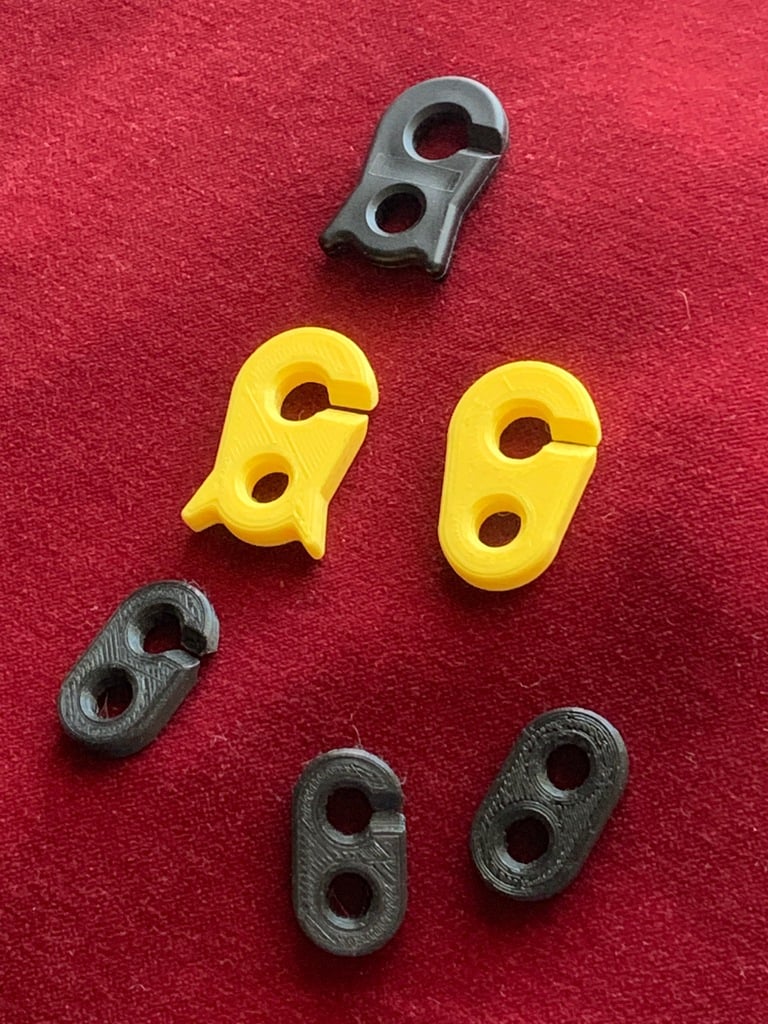
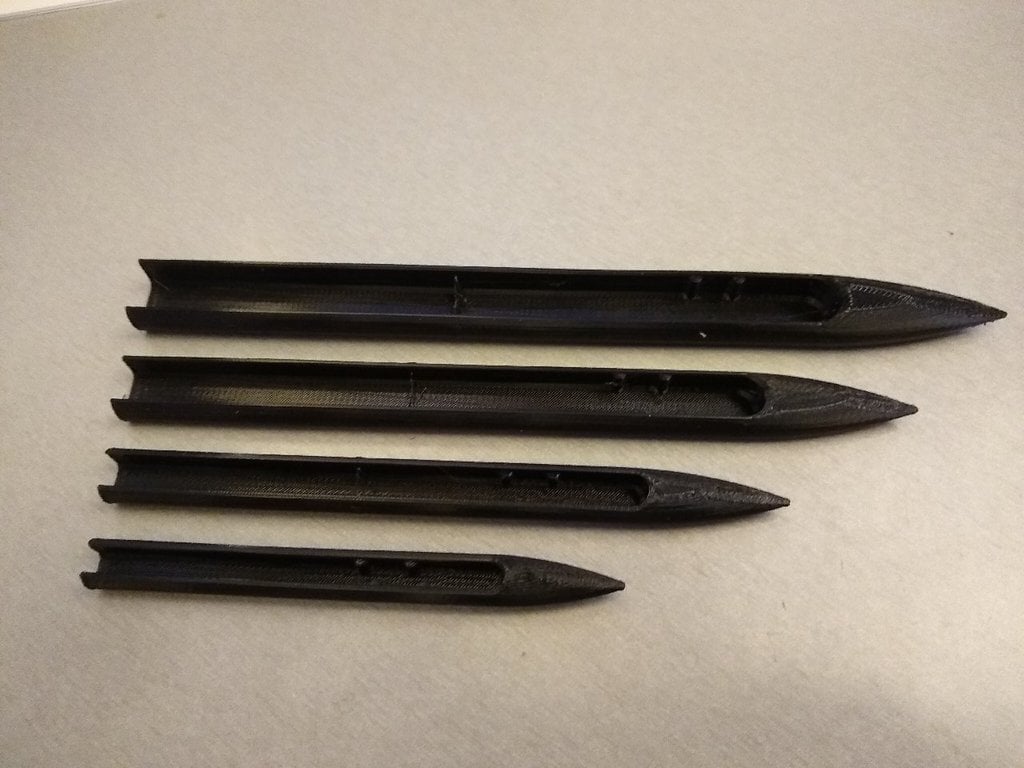
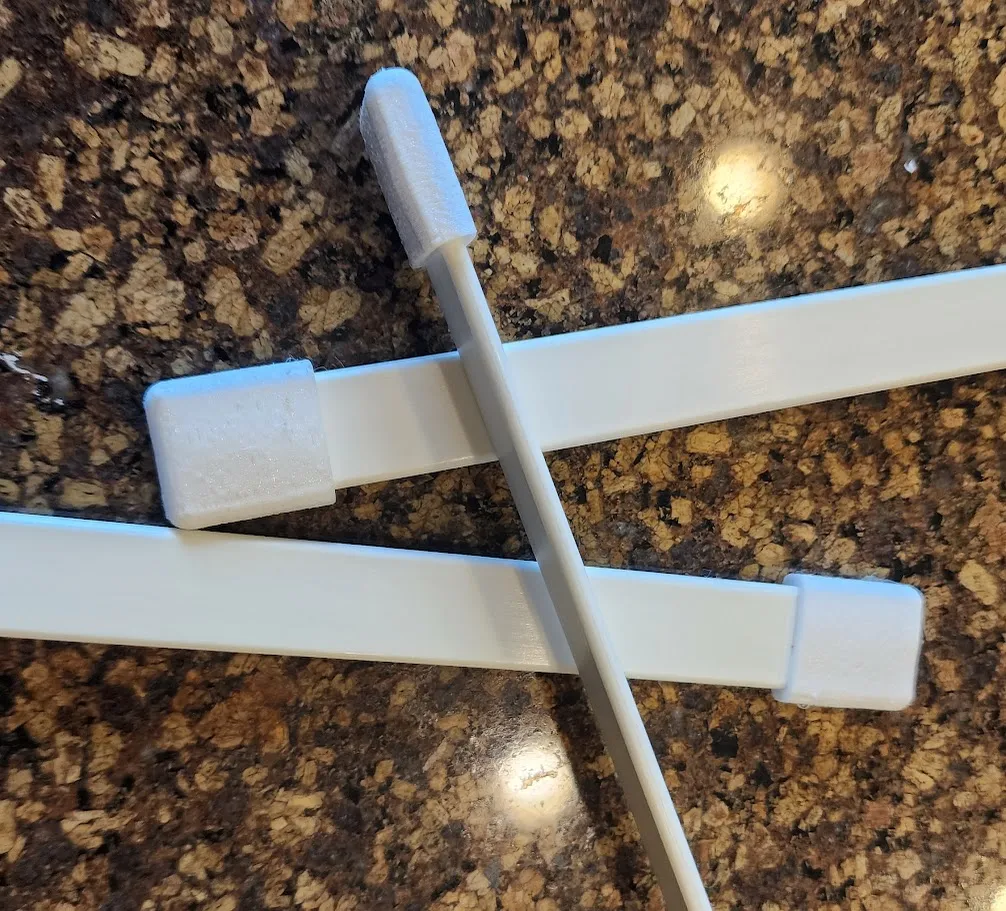
This is my 3D printed puzzle joint router jig. Each identical piece is 6 inches wide. They snap together at the sides using smaller puzzle joints. You can assemble as many as you like; 8 of them would span a 4 foot sheet of plywood.
Attach the assembled jig aligned to the end of a sheet of plywood using your choice of double-sided tape, clamps, screws or small nails (numerous small holes are provided). Then use your router with a flush trim or pattern bit to route the puzzle joint.
To learn all about making and using 3D printed router templates watch this video:
How to make and use 3D printed router templates
The jig is designed to leave a 1/2 mm gap between the plywood sheets when they’re assembled. The gap is there to prevent the glue joint from being starved of epoxy. Use thickened epoxy in the joint and cover the joint on both sides with a strip or two of fiberglass approx 200mm (8") wide. The smaller puzzle joints that connect the jig pieces together have no gap. They are designed to snap the jig together tightly for accurate alignment with no movement.
I am making the 3D printer file available free of charge for downloading here. You are welcome to download and print this jig on any 3D printer. My printer is a Creality Ender 3V3 KE. It informs me that the cost of filament to print each piece of the jig is about $1.50, so a set of 8 costs about $12 USD. I use PLA filament, which works fine, but be aware that PLA softens at 60c/140F and degrades over time under direct sunlight. Mine takes about 90 minutes to print each piece, or 12 hours total print time for a set of 8. The pieces stack up and store away neatly when not in use.
To download the .STL file for the jig to print on your 3d printer click here:
Puzzle Joint Jig.stl
Storage Box.stl
An alternative to the puzzle joint is the "finger scarf" joint, aka the "tapered scarf" joint.
This design has some advantages over the puzzle joint. While It may not interlock and align the parts quite like the puzzle joint does, it does provide a better glue surface and it eliminates issues with glue starvation and gaps when the parts are assembled. If you prefer a finger joint router template to the puzzle joint, download this one instead. Use with a 1/4" (6mm) diameter router bit.
Click here to download the Finger Joint Jig.stl
These 3 videos demonstrate the glue-up: (Credits: B&B Yacht Designs)
Video 1
Video 2
Video3
 |
| Router Bit |
Recommended 3D printer settings for best results:
Layer height 0.2 mm
Seam position Centered on the long straight edge
Wall printing order Outer/Inner
Sparse infill density 15%
Supports None
Brim None